
Be the first to comment.
| Creating a Pop Art, Andy Warhol Style Photo |
| Written by Kristie Bentley, Contributing Editor | |
|
{JCSBOT SUBSCRIPTION=10,13,16,21,22,23}
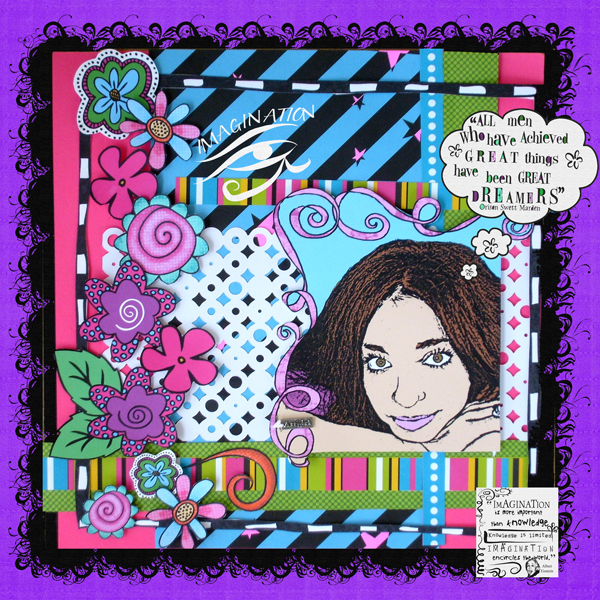 1) Open your photo in Adobe Photoshop...I used Photoshop Elements, and the following instructions apply to that program. I am altering them for Adobe Photoshop 7.0...if something doesn't work right, email me and let me know what it is doing and I'll let you what to do. 2) Using the pen tool, trace around the image. It will put "plotting" dots along the image. When you are finished tracing, you should have a solid line around your subject. Then, right click and hit Make Selection. This will select the image. Now, go to Select>Inverse and it will highlight/select the background. Hi CTRL X to cut...or go to Edit>Cut. Now you should have a blank background, leaving only your subject. **If you are not familiar with the pen tool, use the magic eraser and the eraser tool to delete the background. If you use this method, whenever you are finished erasing, go to Layer>Flatten Image.
3) Duplicate the layer ( press CTRL+J ) For this new layer change the blending mode to Color Dodge (drop down menu on the Layers Palette). 4) Now press CTRL+I to invert the image. The image will be white. Don't panic - this is what we want! 5) Now go to Filter > Blur > Gaussian Blur. I used a radius of 7 pixels, but you can adjust it. 6) Now create a new Threshold Adjustment layer. Go to Layer>New Adjustment Layer > Threshhold. I used the setting of 234, but you can adjust that to get as much detail in your photo as possible. 7) Now Create a new layer ( press CTRL+ALT+SHIFT+N ) Change the blending mode to : Multiply 8) Choose a skin color. Make sure your color palette has a foreground color of the skin you chose, and the bottom background color is white. **In the Color Picker, type in these numbers for a great skin color:
H: 37 S: 44 B: 97 R: 247 G: 205 B: 139 9) Take a brush and start drawing on the face ( be sure you are drawing on the new layer.) It's okay to hit the black lines; it will not cover it up because the layer mode is multiply. 10) Then go to Filter > Sketch > Halftone pattern. I used the following settings: Size: 4, Contrast 8. Play around with it though, it all depends on the size of the photo you are using. 11) Repeat steps 6, 7,8,9 and 10 for each object that you are coloring....for example, you'll have a layer for skin, a layer for hair, etc. You'll have a new layer for every color you are using also. 12) When you are finished coloring in your layers, go to Layer>Flatten Image. You're finished! Here is another example of a layout I did with this technique: | |
|
» Comment here!
» Post Comment
Only registered users can write a comment.
Please login or register. |
|
| < Prev | Next > |
|---|