|
Written by Joscelyne Cutchens, Contributing Editor
|
{JCSBOT SUBSCRIPTION=10,13,16,21,22,23} 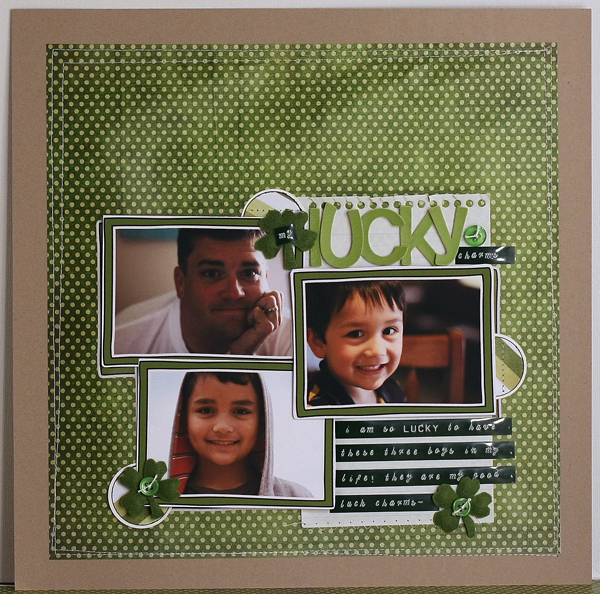
In honor of St. Patricks Day, I thought Id make a layout of my three lucky charms - my husband and our two sons, featuring digital frames on their photos. I looked through my green digital papers and chose two from Miss Mint. I also looked for frames that Id either recolor green or were already green. I lucked out and found this green frame from a Christmas Kit. Then I searched through the last months photo folder and picked out a picture of each of my boys.
To add a frame to my photos:
In Photoshop Elements, open the frame and photos you want to use. Add the frame to each of the photos by clicking and dragging the frame on to the thumbnail of the photo in the project bin. When you let go, the frame is then copied to the picture.
My picture is in the landscape orientation and my frame is in the portrait orientation, so I need to turn the frame. Click and hold the shift key while turning the frame and let go when it is oriented properly. Now click and drag on the frame to make it large enough to fill almost the whole frame. To be able to move the photo around and resize it, the photo must be made into a layer and not locked as the background.
Go to the layers palette and double click on the name part of the photo layer and a popup window (New Layer) opens. Click okay and now the photo is layer 0 can be resized. Resize and move the photo around until you are happy with the portion showing through the window.
When you are ready to crop out the picture not in the frame, select the area to be removed using the marquee tool, making sure the picture layer is selected in the layers palette and then hit delete. Repeat these steps until all parts of the picture that you want out are removed. Now go to the layers palette, right click on the name of the layer and merge down and your framed picture is all ready to use!
Repeat the process for each of your photos and drag them onto the background paper and move them around until you are happy.
Save your layout as a new image and also save your 3 photos as new images.
Print your framed photos using the print multiple photos command. When the print window pops up, all of the open images are in the list to be printed. Simply remove the images you dont want to print until only your 3 photos are in the print list. Print them on the highest resolution on matte photo paper. Once they are dry, just trim and set aside.
Finishing Instructions:
- I took the layout down to my local office store and had the layout printed on a color laser printer ($.98 at my store) on an 11x 17 (they didnt have larger for 12x12 print). I brought it home, trimmed on my paper cutter and placed the photos over the photos in the layout
The prints from home are just a little smaller than the ones printed on the background paper and this lends to a cool layered look.
- Next mount foam squares on the backs of the pictures and figure out where you want the rest of the elements to fit in.
- I knew I wanted to use some green vinyl thickers for my title but didnt like that they were blending into the background, so I pulled out a sheet of notebook paper and placed it under my picture with just enough space to add the letters - happiness!
- I used a dymo caption maker to type out the rest of my title my and charms.
- I then placed the journaling strips from the caption maker on the bottom of the notebook paper.
- Adhere all the pictures down with the foam squares.
- Now I look to my Making Memories green felt flowers to transform into shamrocks. I trim one petal into a stem and cut a notch out of the other four to make them more heart shaped. I repeat until I have 3 finished shamrocks.
- Stitch buttons on two of the shamrocks and stick my on the shamrock near the title.
- I punch 3 1¼circles out of the striped paper I had laser printed and 3 1⅜ circles out of plain white paper.
- Next ink the edges of the patterned paper to mimic the black lines on the frames.
- Mount the inked, patterned paper circles on to the white and arrange around the photo cluster to create a visual triangle.
- Then take the entire layout to the sewing machine, stitch the green to the Kraft Cardstock and stitch the circles and the notebook paper.
Digital Supplies:
www.peppermintcreative.com
- Miss Mints Jingle Bell Rock- x-mas wreath paper
- Miss Mints Candy Cane Christmas- sugar stripe paper
- Miss Mints Candy Cane Christmas Frame 1
Traditional Supplies:
- Stampin Up! White Cardstock
- Kraft Cardstock
- Vinyl Thickers, dymo caption maker, green tape
- Making Memories felt flowers
- Green Buttons bought in bulk at local store
- ATG gun
- glue dots
- foam adhesive
- Versafine Black pigment ink
- Notebook paper
Tools:
- Photoshop Elements 6
- Ink Jet Printer, color laser printer, matte photo paper, and regular paper.
- Tonic Paper Cutter, tonic Scissors, bumble bee scissors.
- Stampin Up! Circle Punches 1 ⅜ and 1 ¼.
- Sewing Machine, white thread.
- Needle, white crochet thread.
|
Joscelyne Cutchens, Contributing Editor |
| About the author: |
| Joscelyne (Joscie, rhymes with bossy) Cutchens has been crafty for most of her life. She has dabbled in creating hand made papers, sewing, screen printing, book binding and beading but her true passion is in photography, computers and paper crafts. Cutchens says that Hybrid crafting is a great way to incorporate all of her passions in one hobby. |
| Read More >> |
» 1 Comment
1Comment
at Saturday, 14 March 2009 15:05
Congratulations, Joscie! Whoooo Hoooo! Always admired your creations, lots of inspiration!
Hugs,
PattiM
(Pattie's passion)
I Scrap So All Moments Are Remembered!!!
» Post Comment
Only registered users can write a comment.
Please login or register.
|