
Same Products - Different Takes: Prima Hybrid & Brindy’s Backyard
December 3, 2009 by Kristi McFadden
Filed under Layouts, Product Review, Projects, Vol 2 Issue 4
PRIMA HYBRID
Prima Marketing is no stranger to the scrapbooking industry. They are currently coming out with creative and beautiful products that we can use inside our scrapbooking and crafting projects. At the beginning of this year Prima took a big step and launched their Prima Hybrid line of products. Prima Hybrid products have both traditional and corresponding digital products that work together so seamlessly that you can confidently blend the traditional and digital products together.
The Same Products Different Takes Team was given a collection of Prima’s Rue 88 Papers and Embellishments along with their hybrid counterparts. Snip, clicks and a few embellishments later… we give you our takes!

TAKE 1:
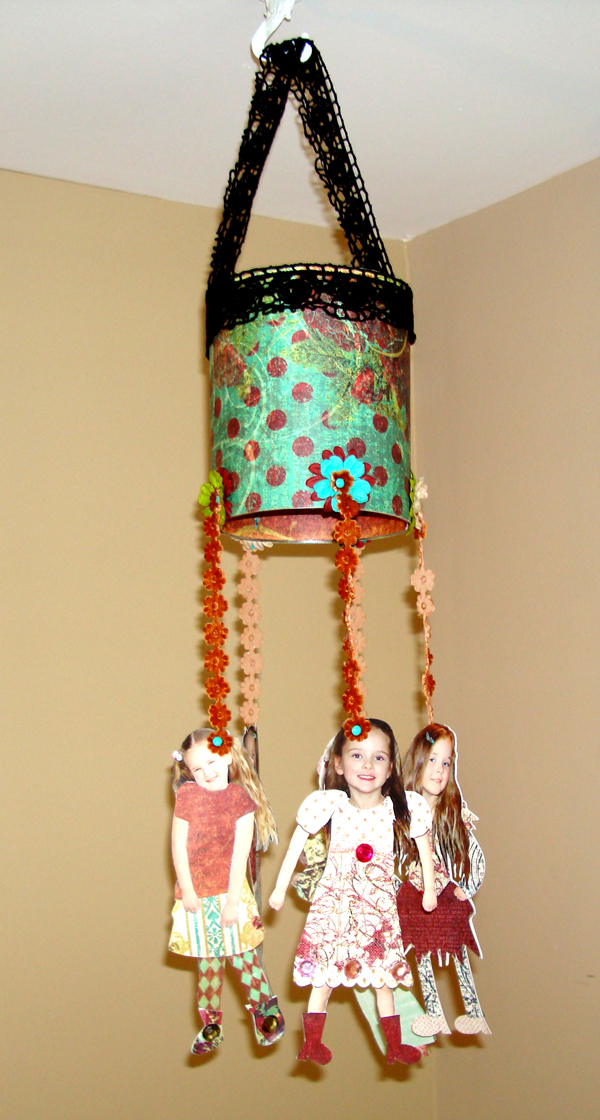
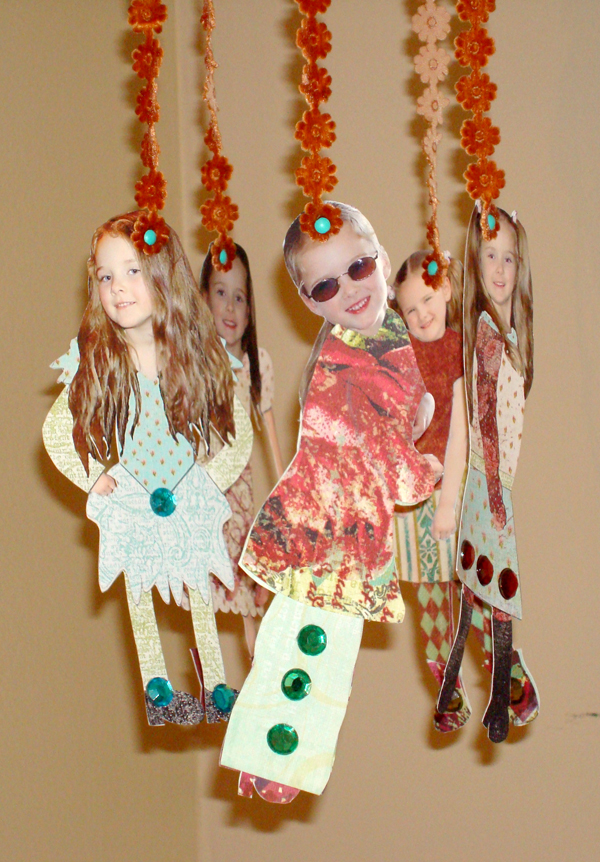
“Fashion Mobile”
By Kristi McFadden
Supply List:
- Prima Marketing Inc.- Rue 88 Papers: Marché de Fleur, Café Diamant, Rendezvous, Feuilles
- Prima Marketing Inc.- Rue 88 Gems –Center Kissed Round 9mm, Ribbon - Elyseé and Flowers – Essentials 3 Rue 88
- Prima Marketing Inc.- Prima Hybrid Rue 88 Digital Papers and Embellishments
- Stemma – Mini Brads: Summer
- An old tin can
- Adhesive – Provo Craft: Terrifically Tacky Tape, Pantel: Tape’n Glue and Scotch: Scrapbookers Glue
- We R Memory Keepers - Crop-o-dile
- Adobe Photoshop CS
- Epson Scrapbook Ultra Premium Matte Paper
- Epson R1900
Directions:
- Wash and dry an old tin can.
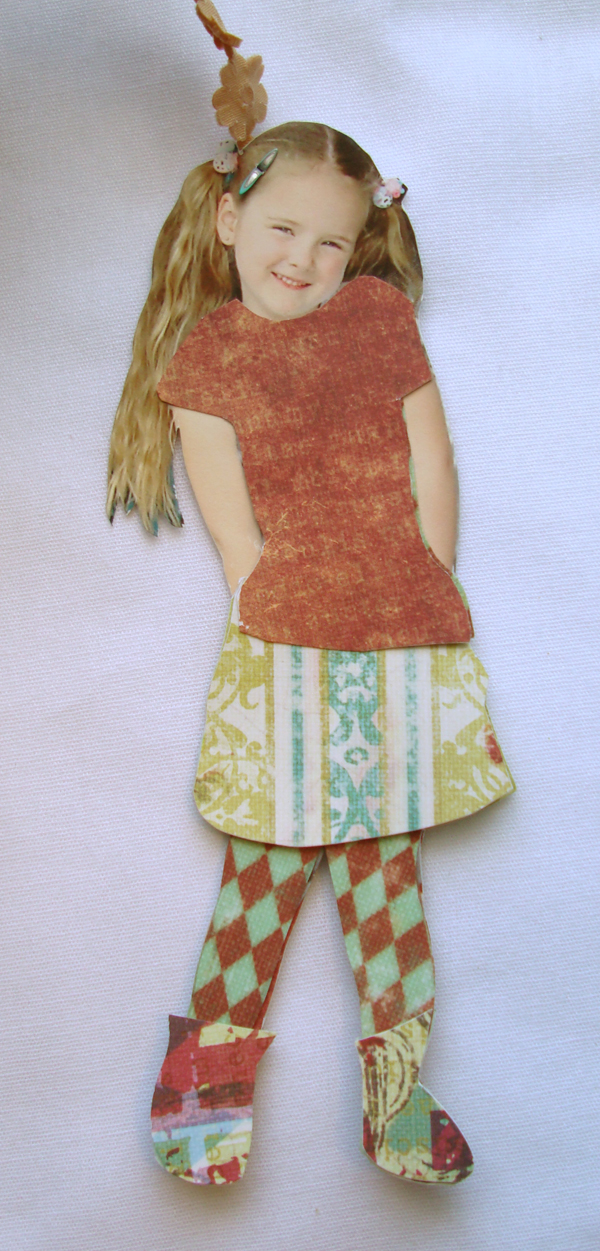
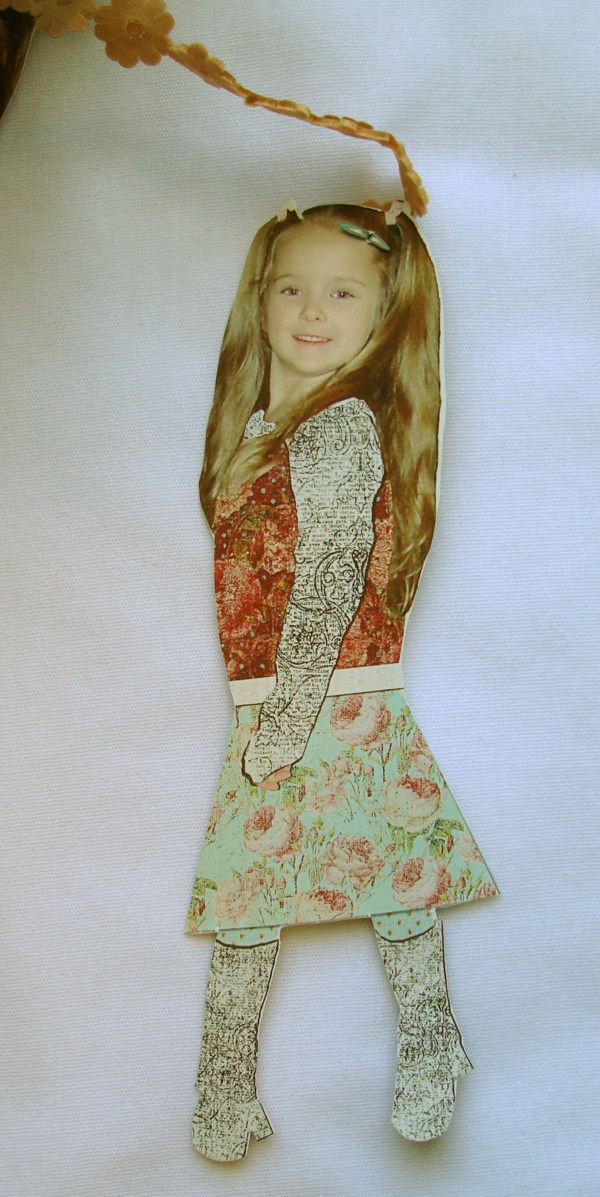
- Import your pictures into your photo-editing software. Use the photos as a guide to create clothing shapes that will cover what is worn in the pictures. (Similar to making Paper Dolls.)
- Import the Digital papers from Prima and cut out pieces to fill the clothing shapes.
- Select some photographs to be altered after printing.
- Print out photographs, clothing pieces and the pictures that have been altered with digital papers for the clothing.
- Cut out each photograph into silhouettes and the separate clothing pieces.
- Using the printed out clothing shapes and the un-altered photographs, cover the pictures to make new outfits for the photo.
- Cover the tin can with Prima’s Rue 88 papers. Cover the inside, outside and bottom of the can.
- Using the Crop-o-Dile, punch holes, spaced evenly, around the lip of the tin can; one for each of the photographs.
- Turn the can over. The bottom is now the top of the can. Adhere ribbon around the base of the can and use the excess to make a handle. (Like a purse strap)
- Cut another ribbon into equal lengths; one section for each photograph.
- Using a brad and some flowers affix the ribbon into each hole you punched earlier. Layer it so that the ribbon is closest to the can, then the flowers and on top the brad.
- Use a brad at the bottom of each ribbon to attach each photograph.
- Add flowers and other gems or embellishments to the individual photographs.
- Hang and enjoy.

TAKE 2:
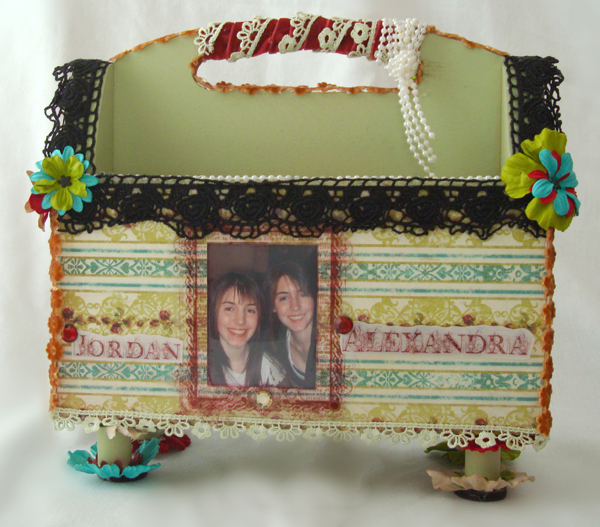
“Café Caddy”
By Laura Vaughn
Supply List:
- Paper: Rue 88 collection “Feuilles”
- Paper: Rue 88 collection “Café Diamant”
- Flowers: Essentials 3 Rue 88
- Ribbon: Elysee Ribbons
- Crystals: Center Kisses (9mm)
- Digital Alpha: Silhouette: Gem Alpha Royal
- Digital Frame: Silhouette: Gem Frame Fleurish
- Digital Paper: IOD Rue 88 Collection (Paper #12)
- Software: Adobe Photoshop CS2
- Printer: HP Photosmart 3310 All-In-One
- Electric Drill
- Sponge Brush
- Scissors
- Pencil
- Ruler
- Hot Glue Gun
- Brayer
- Wood Caddy
- 4 Wood Spools (size: 3/4” x 1”) by “Lara’s Crafts”
- 4 Screws (size: 6 x 1 5/8)
- Spray Paint Color: Prairie Grass by “Design Master”
- Transparency Film (Multipurpose) by “3M”
- Translucent Vellum (Inkjet Printable) by “Worldwin Papers”
- Adhesives: Mod Podge (matte) by “Plaid”
- Glue Dots (size: mini) by “GlueDots Int.”
- Embellishments: Metallic Mini Flower brads by “Making Memories”
- Pearl Trim
Directions:
- Trace each side of the wood caddy onto the paper of your choice.
- Spray-paint the wooden caddy and spools. Let dry.
- Cut out the tracings.
- Using a sponge brush & Mod Podge, attach the cut-outs to the sides of the wooden caddy and then seal the paper by painting another layer of Mod Podge on top. Use the brayer to smooth out any air pockets. Let dry.
- With a glue gun to attach them, decorate the edges of the caddy with the ribbons and pearls.
- With a brad, connect a stack of 2-3 flowers. (Make 6 sets.) Use the glue gun to attach them to the caddy.
- Glue 1 large flower and 1 small flower together, then glue the flower set to the bottom of a spool. (Make 4 sets.)
- Glue 4 sets of 2 small flowers together, then glue a set to the top of each spool.
- Using a ruler and pencil, draw a mark where you would like the screws/spools to be placed in the bottom corners of the caddy.
- Push the screws through the holes in each spool. Push through the end with the larger flower first. (Depending on the thickness of the glue, you may need to use your drill.)
- While holding the spool, line up the sharp end of the screw with the mark that you made on the bottom of the caddy. Gently screw it in with the drill. (Don’t go too fast. You don’t want to crack the wood.) Repeat 3 more times. Now your caddy has feet!
- Measure the area where you would like to place the photo and frame.
- Make a new file in Photoshop. (Make sure the rulers are visible.) Open a photo you would like to use and move it to the new file.
- Open the Digital Frame and move it to the same file. Depending on the measurements you took, either resize the photo, the frame or both so they will fit within your measurements.
- Open the Digital Paper and move it to the same file. Make sure the Digital Paper layer is directly above the Digital Frame layer. Right-click the Digital Paper layer and select: Create Clipping Mask. Now your frame should match the paper.
- Right-click the Digital Paper layer and select: Merge Down. (Now the two layers have become one.)
- To be safe, save the whole file as a PSD.
- Hide the Paper/Frame layer from view.
- Print the Photo layer.
- Turn the visibility of the Paper/Frame layer back on and hide the Photo layer.
- Save file as a PNG.
- Print the Frame on the Transparency Film.
- Cut out the Photo and Frame. Attach the Photo to the caddy with Glue Dots and then attach the frame on top of the photo with Glue Dots.
- For extra “bling,” attach the crystals with Glue Dots.
- As for the names, create them the same way as the Digital Frame.
- Tip: Open all the letters that you would need and move them into a new file. (Showing the grid helps to line up the letters.) Once your letters are the correct size and lined up, merge all of them together. Next, open the Digital Paper, move it into the file and create the Clipping Mask. (See step 15.)
- Print the names twice; first on the Transparency Vellum and the second time on the clear Transparency Film. Cut them out and attach with Glue Dots.

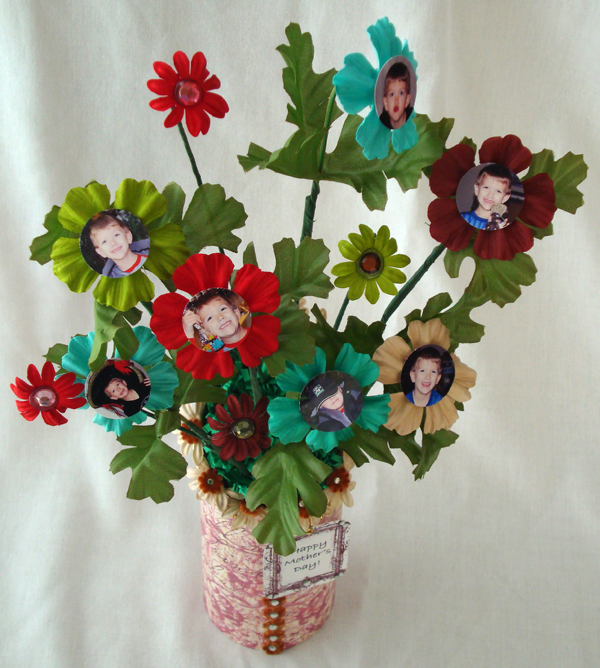
TAKE 3:
“Mother’s Day Flowers”
By Marge Lutz
Supply List:
- Pringles potato chip can
- Digital Paper – Rue 88 Coordinates paper #11 – Prima Marketing
- Digital Frame – IOD Silhouette Gem Frame Fleurish – Prima Marketing
- Flowers – Rue 88 essentials – Prima Marketing
- Adhesives:
- Scrapbook Adhesives Click ‘n Stick Mounting Squares
- Pop dots – Stamp Craft, Inc.
- Incredi-Tape!
- Tools:
- Glue gun – Crafty Magic Melt Low Temp Bonder
- Lorna Decorative Touch (hot fix) wand
- Miscellaneous pliers, jewelry pliers
- Punches – EK Success
- Software – Microsoft Digital Image Suite 2006
- Adobe Photoshop
- Printer – Canon Pixma IP 4300
- Ribbons - Elysee? ribbons – Prima Marketing
- Corner Punch – unknown brand
- Floral wire – Panacea Products Corp., Columbus, Ohio
- Leaves – from miscellaneous silk flowers had on hand – used the leaves only
- Floral tape – Panacea Products Corp., Columbus, Ohio
- Beads – had on hand
- Bead wire – Westrim Crafts
- Oasis – had on hand
- Hot fix crystals – Tulip
- Grass – Holiday Inspirations, Joanne’s Arts & Crafts
- Center Kisses (crystals) – Prima Marketing
- Fonts used – Bradley Hand ITC
Directions:
- Cut Pringles potato chip can in half at an angle.
- Made a pattern using the potato chip can to ease in covering the potato chip can.
- Printed digital paper on home printer.
- After cutting paper to correct size, glued it to the outside of the can.
- Glued a strip of the rust colored flowers down the can hiding where the ends of the cover paper meet.
- Selected flowers to glue around the slanted edge of the can and glued them in place on the inside of the can only.
- Inserted the lining piece of paper and glued in place to line the inside of the can where the finished product will show.
- Filled the can with a piece of oasis floral foam.
- Selected photos and edited them using Microsoft Digital Image Suite 2006 and Adobe Photoshop.
- I printed them on my printer.
- With a circle punch I punched out the photos.
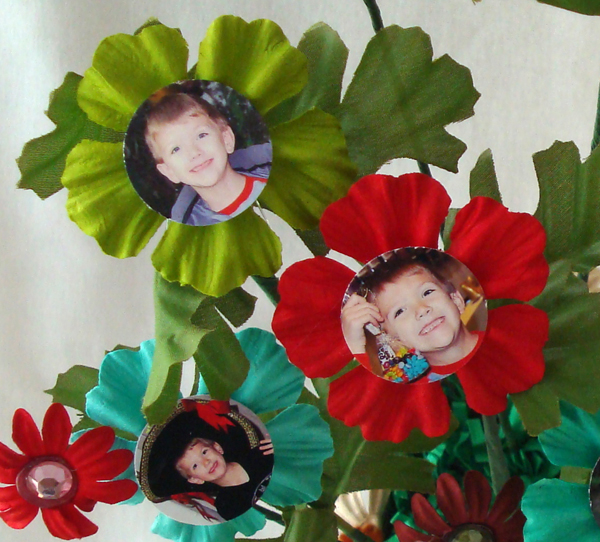
- Glued the photos onto the center of the larger flowers using pop dots.
- Using pliers I twisted one end of the floral wire to form a circle to hold the photo flowers.
- Attached silk leaves to the floral wire with floral tape.
- Attached the photo flowers.
- Covered the top of the oasis with Easter grass.
- Pushed the photo flowers into the oasis foam.
- Printed frame with Mother’s Day greeting on it.
- Strung beads onto wire for necklace to hold the Mother’s Day frame.
- Attached the necklace and Mother’s Day frame in the back with hot glue.

TAKE 4:
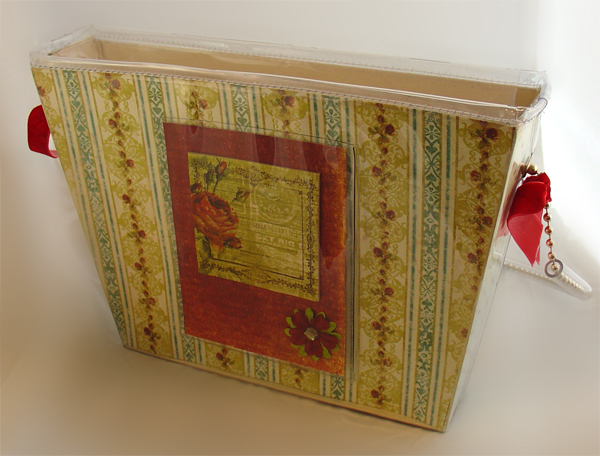
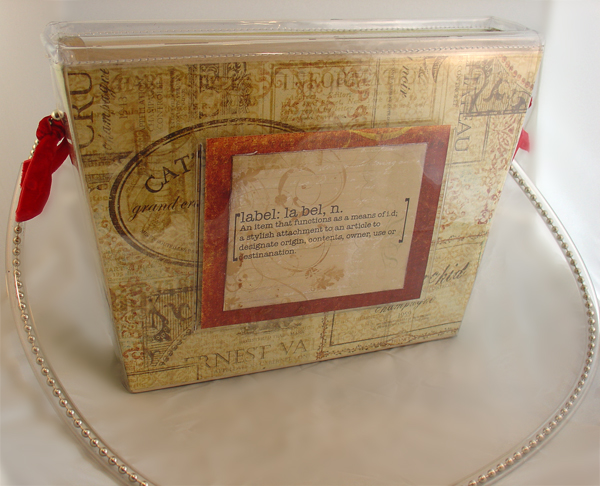
“Personalized Purse”
By Becky Evans
Supply List:
- Purse – www.pursueyourart.com
- Digital & Traditional Papers – Prima Marketing Inc, (Prima Hybrid)
- Embellishments – Prima Marketing Inc, (Prima Hybrid)
- Digital Tag Wordart – Vintage Newspaper Digital Kit by Rhonna Farrer, www.twopeasinabucket.com
- White Cardstock
- Ink – Stampin Spot: Stampin’ Up
- Adhesive – Double stick Tape: Herma
- Program: Microsoft Digital Image Suite 2006 Editor
- Printer: Cannon i9900
Directions:
- Remove inside pattern from purse
- Trim Paper to fit each section of pattern.
- Insert paper into each section of the purse.
- Embellish one side pocket with chipboard embellishments, flower with center kisses.
- Using Digital Image Suite create a tag with the digital word art.
- Print the tag on white cardstock.
- Embellish the purse with ribbon and enjoy!
Brindy’s Backyard
Brindy’s Backyard is a darling, family run business that came onto the scene last year at Memory Trends in Las Vegas. They offer a line-up of ready to assemble (complete packets) and pre-assembled products that can really speed up your crafting. Along with the pre-assembled or complete packets that they offer they launched their Acrylic Albums. These albums are thicker than the standard acrylic albums on the market. The thickness allows for greater use and sturdier final products.
The Same Products Different Takes Team was given the “Shelby” Clear Acrylic Book to play with. Snip, Clicks and a few embellishments later we give you our take on these cool acrylic books.

TAKE 1:
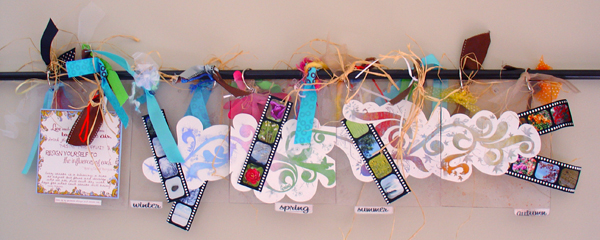
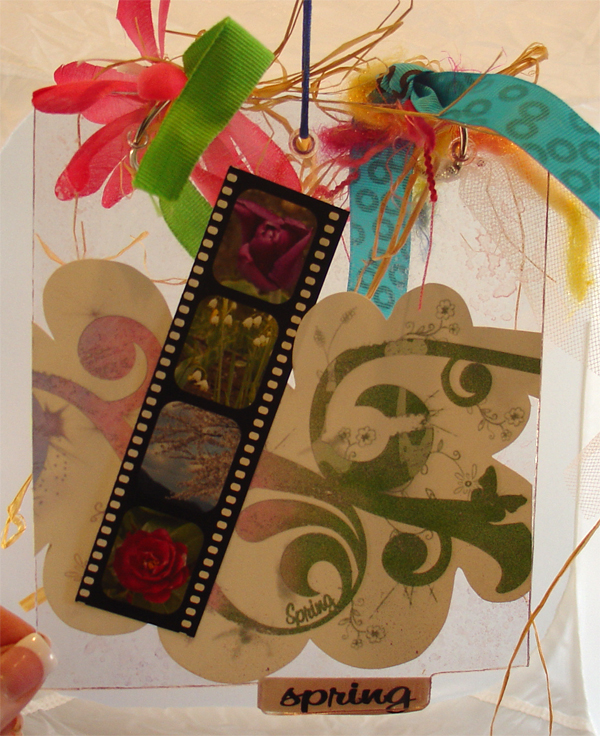
“Seasons Wall Décor”
By Kristi McFadden
Supply List:
- Clear Acrylic Book: “Shelby” – Brindy’s Backyard
- Epson Scrapbook Ultra Premium Matte Paper
- Printer: Epson R1900
- Pantel – Tape’n Glue
- Digital Brushes – Created by Miss M at www.missm.paperlilies.com
- Glimmer Mist – Tattered Angel
- Digital Filmstrip – Kristi McFadden
- Ribbon, Rafia, Snowflakes, O-rings and Strings – Miscellaneous Scrapbooking Supplies
- Program: Photoshop CS
- Fonts: 1 Bean Sprout DNA, LittleLordFontleroy, Asian, A Yummy Apology, MA Sexy, Prime Minister Of Canada, Be Aggressive, FG Maria, Flair, FG Gabriella, HandScriptLefty, Bambino, and Ashley
Directions:
- Select digital photos that fit your favorite seasons and open them into Photoshop.
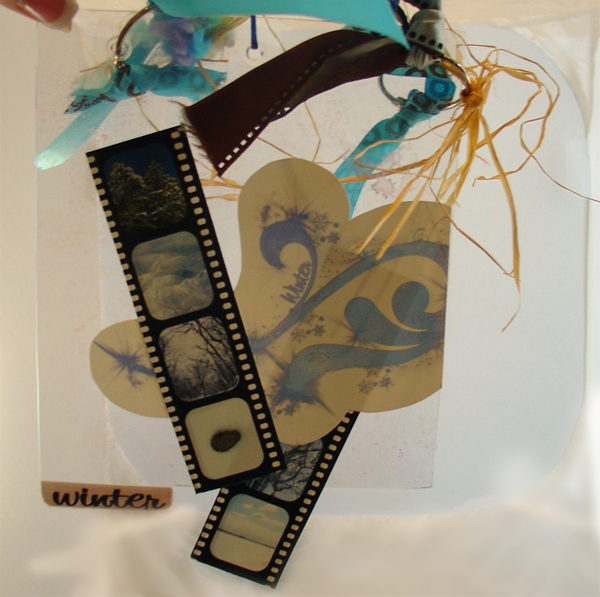
- Open up the digital filmstrip into Photoshop.
- Create a 12” x 12” document and drag the photographs and the digital filmstrip into the document.
- Duplicate the filmstrip as needed to create enough for your photographs and then place the photographs, according to seasons, behind the individual frames of the digital filmstrip. Crop as necessary.
- Link the filmstrip and pictures together (link each grouping separate)
- Hide these items and make a new layer in Photoshop. Fill it with white.
- Using the digital brushes, create an artistic edge around the layer.
- Use your paint bucket to fill in the brushstrokes with various colors. (I pulled colors out of my photographs to help match everything together. I tried to get one color from each season.)
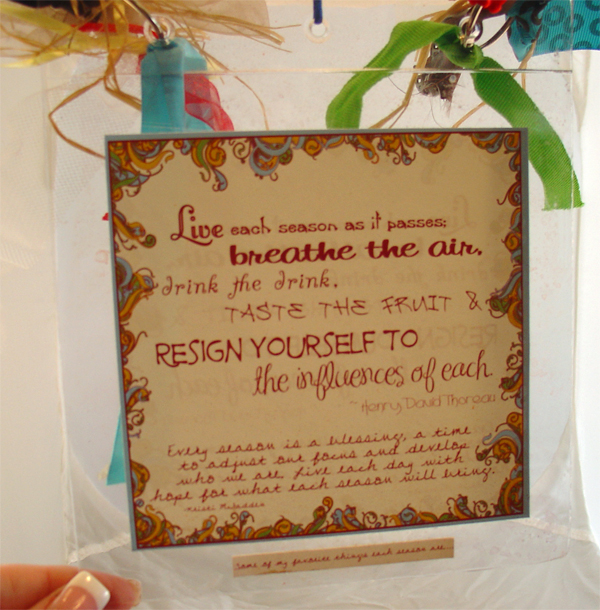
- Insert your text (quotes, etc) using the fonts that fit your personality. (Be sure to spell check.)
- Save this file as a .jpg and then hide the layers in your document.
- Open the .jpg up and insert it back into the document you are working in. Resize it so that it will fit on one of the Acrylic album pages. (I made mine about 5.5” x 5.5”)
- Arrange the filmstrips and the Quote portion on the 12×12 page. Around these you can add additional embellishments, brush strokes, words, etc to use in the project.
- Print this out on a 12”x12” piece of inkjet printable cardstock. I like Epson’s scrpabooking paper because it is intended for double-sided printing.
- Since the album is see through you can flip your canvas and reprint these again on the other side of the paper so that, once cut, it will have the image on both sides. (You will have to fix the text though so keep that in mind. To avoid backward text I flipped the canvas first and the re-inserted anything with text and placed it over the areas that had been effected by the flip.
- Make a second 12”x12” canvas and create a row of swirly doodles. You will be cutting this into 4 parts so try to theme it according to the seasons. (On the first portion I have wintery brushes, the second focuses on spring, the third on summer and the forth focuses on autumn. The primary design is a strong set of swirl brushes that I connected together at various points. Since I don’t want to have to use 2 papers to print I have broken the design up in half.)
- Once you like your design, go back and enhance it with color.
- Print this out. You can also make this double-sided; just remember to adjust or remove the text when you flip the canvas.
- Now it is time to assemble. First, lay out each of the pages you will use from the acrylic album. The left side will be for the quote box (like a title page if you will) and the following pages will be for each season. I set the pages side by side so I could line everything up well.
- Next, cut out each filmstrip, the quote box, and the decorated swirl. For the swirl I left a margin of the white paper around it rather than trying to cut around each individual brushstroke.
- Arrange the items across the acrylic pages. Mark where you need to cut to separate the swirl design. Use the filmstrips as an accent for each of the seasons. If you don’t use all the ones you printed that’s okay.
- Adhere the items to the acrylic pages.
- Spray the front of the album lightly with various colors of Glimmer Mist to give it a little shimmer. Let it dry.
- Add O-rings into the holes along the top of the album pages.
- Decorate the rings with various ribbons, raffia, etc. You can add glittery items, seasonal accents and so forth to the ties to help accent the seasons.
- Hang either on the wall using hooks and a wooden dowel or you can use a pressure rod and hang it in a doorframe or window.
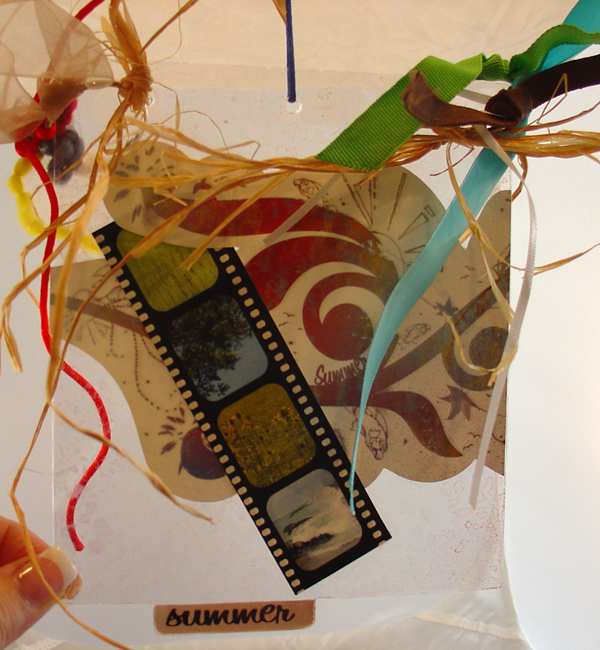
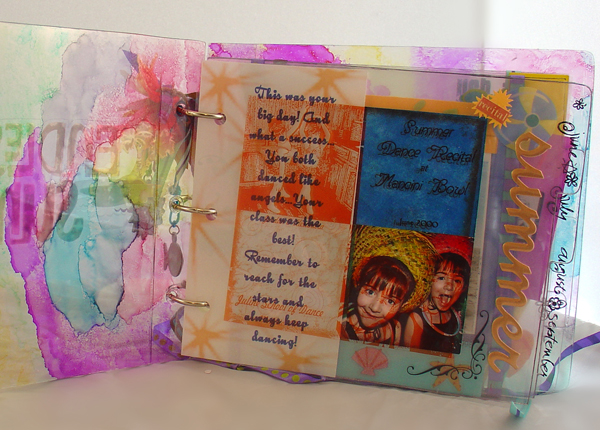
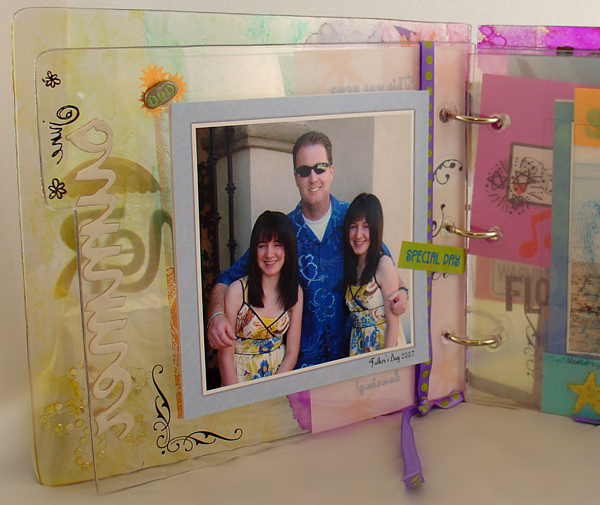
TAKE 2:
“Endless Summer”
Supply List:
- Clear Acrylic Book: “Shelby” – Brindy’s Backyard
- Software: Microsoft Digital Image Suite
- Printer: HP Photosmart 3310 All-In-One
- Scissors
- Pencil
- Ruler
- Rotary Mat
- Paper Cutter
- Hole Punch
- Hot Glue Gun
- Transparency Film (Multipurpose) by “3M”
- Adhesives: Glue Dots (size: mini) by “GlueDots Int.”
- Paint: Adirondack Alcohol Inks by “Ranger Industries”
- Embellishments:
- Blue & Green Cotton Cord by “Toner Plastics, Inc.”
- Toby Tiny Ribbon by “KI Memories, Inc.”
- Silk Flowers by “Prima Marketing, Inc.”
- Metal Sun Tag by “Flair Designs, Inc.”
- Metal Swim Tag by “Flair Designs, Inc.”
- Stickers & Rub-Ons:
- Travel by Plane by “Sandylion Sticker Designs”
- Copper Summer by “Pressed Petals”
- Spring Jewels (rub-ons) by “Bo-Bunny”
- Calendar Rub-bits (rub-ons) by “Karen Foster Design, Inc.”
- Ellen’s Tropical Summer by “Me & My Big Ideas”
- Flower-Rhinestones by “Me & My Big Ideas”
- Endless Summer by “EK Success”
- Swimming by “EK Success”
- School by “EK Success”
- Beach by “EK Success”
- Pool Party by “EK Success”
- Silhouette Ballerina by “EK Success”
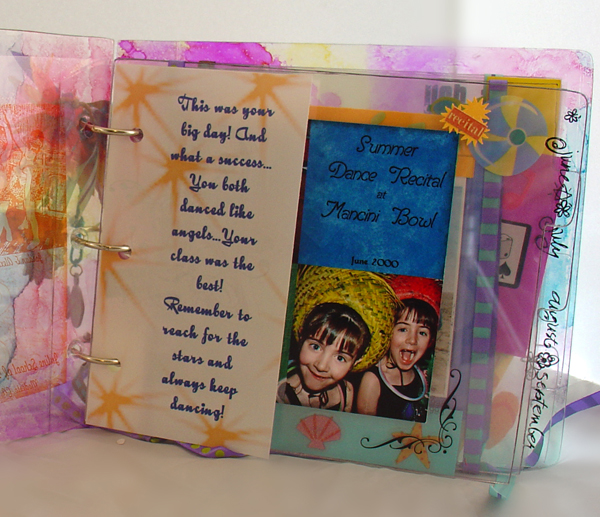
Directions:
- Choose & print the photos you would like to use. Remember to size them according to the size of the album pages.
- Use a filter on the same photos and print them a second time on a clear transparency.
- Using Glue Dots, attach the photos to the acrylic pages.
- Line up each transparency over each photo/acrylic page and cut them out. Don’t forget to mark the holes and punch them out. (A rotary mat helps with lining things up!)
- Embellish your album with anything your heart desires. (alcohol inks, stickers, ribbons, papers, etc…)
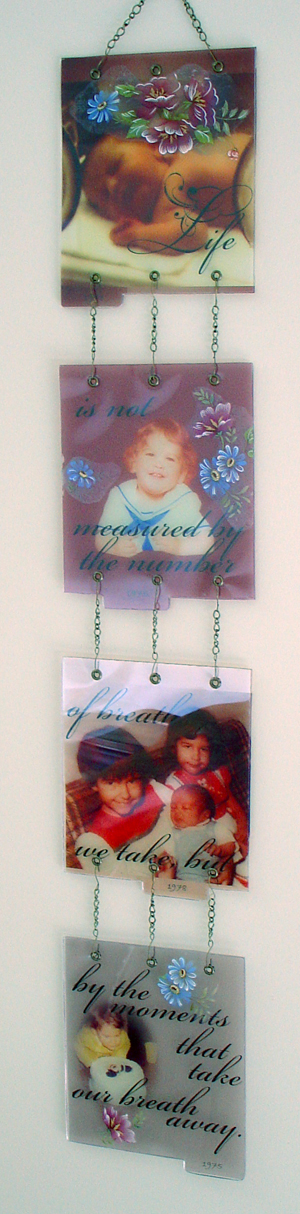
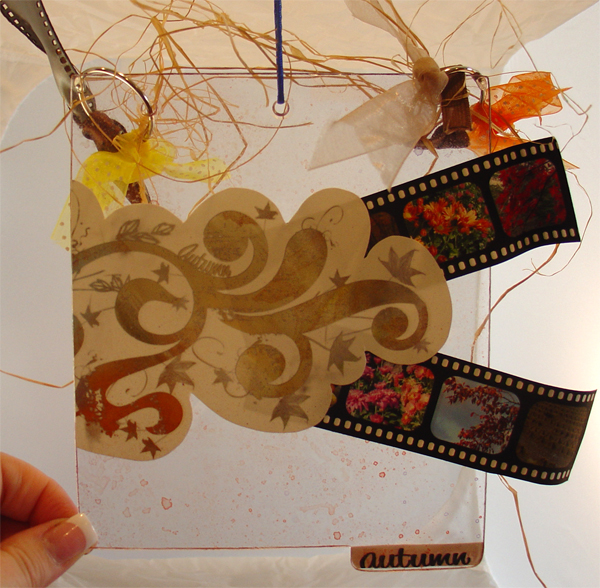
TAKE 3
“Life”
By Marge Lutz
Supply List:
- Clear Acrylic Book: “Shelby” – Brindy’s Backyard
- HammerMill - Transparency paper
- Decals – Decorprint S.A. ceramic transfers
- Chain – Jewelry Fundamentals Chain Necklace Kit, Antique Brass finish, Sulyn Industries, Coral Springs, FL
- Eyelets: We R Memory Keepers
- Tools: pliers, jewelry pliers to bend wire for the ‘s’ hooks
- Crop-A-Dile – We R Memory Keepers: to add more holes for hanging
- Software – Microsoft Digital Image Suite 2006, Adobe Photoshop CS2
- Fonts: Bradley Hand ITC, Beautiful ES
- Brushes: Rhonna Farer Sassy Swirl2 Transparency
- Printer – Cannon Pixma IP 4300
Directions:
- Choose the photos you want to use and edit them. I used Microsoft Digital Image Suite 2006 and Adobe Photoshop CS2. If desired, create a layout for each photo to enhance it.
- Add the text and the dates to each of the four photo layouts.
- Print each one out onto transparency paper.
- Let it dry and then trim them to the correct size for the acrylic album page.
- We are going to hang this vertically so each of the top 3 acrylic pages will need holes at the bottom. Using the Crop-A-Dile, add more holes to the first three sheets of acrylic, line the pages up so the holes you punch corresponding with the next page of acrylic. This will make sure they hang straight.
- Attach eyelets.
- Bend wire into ‘S’ hooks and cut the chain into equal pieces.
- Attach them to the acrylic sheets and add each page in order so they hang in a line.
- Attach additional chain to the top, making a handle, to hang the entire piece.
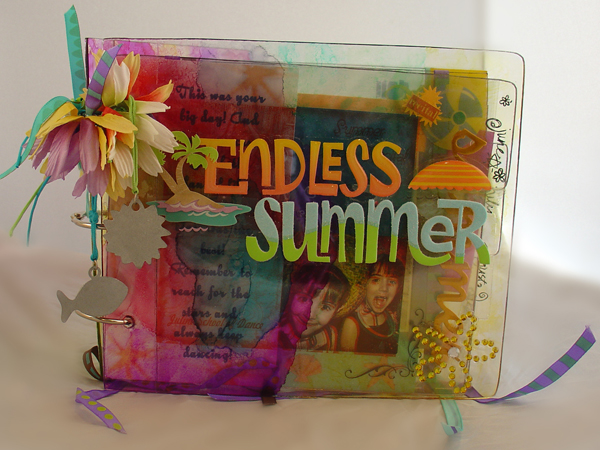
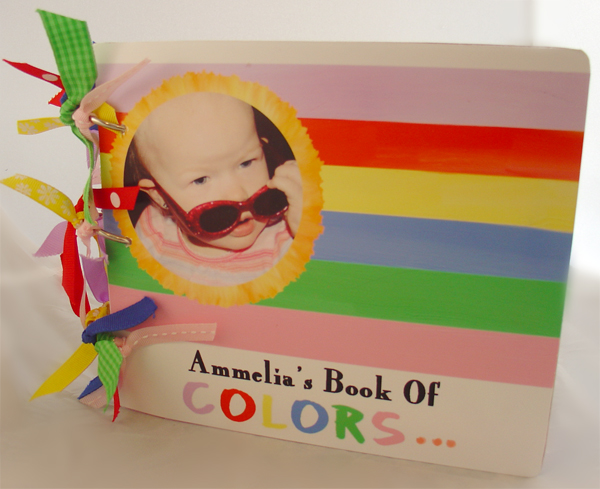
TAKE 4
“Ammelia’s Book of Colors”
By Becky Evans
Supply List:
- Clear Acrylic Book: “Shelby” – Brindy’s Backyard
- Photo Paper – Lustre Professional Photo Paper: Office Max
- Paint Me Happy Digital Kit – Shabby Princess Designs (on the Font and Back Cover, the red heart, yellow star and pink circle)
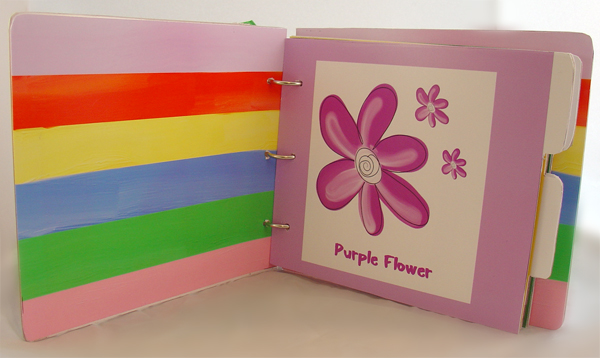
- Painted Doodles and Flowers Digital Kit - Scrapartist (purple flower)
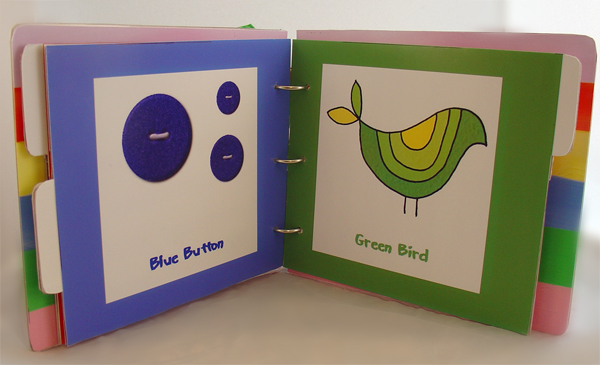
- Things That Fly Digital Kit – Pattie Knox (Blue Button)
- Groovy Rock and Roll 60’s Digital Kit – Erica Hite (Green Bird)
- Fonts: Marker and CK’s Stylish Black
- Ribbon – Miscellaneous Scrap Supplies
- Double Stick Tape – Herma
- Printer: Canon i9900
- Program: Microsoft Digital Image Suite 2006 Editor
Directions:
- Open Microsoft Digital Image Suite and create a 7.5” by 6.5” canvas.
- Create each page with your digital papers and elements.
- Insert a text box on each page and type the information you want.
- Adjust the background paper to match (using the color matching eyedropper) the color of each element used.
- Save each page as a .jpg and print them onto 8.5”x11” photo paper.
- Trim each printed page to fit the acrylic pages.
- Attach with adhesives.
- Use the provided O-rings to attach the book.
- Decorate the rings with ribbons for each color in the book.

![]()
 Photography - What's Your Angle?


Facebook comments: