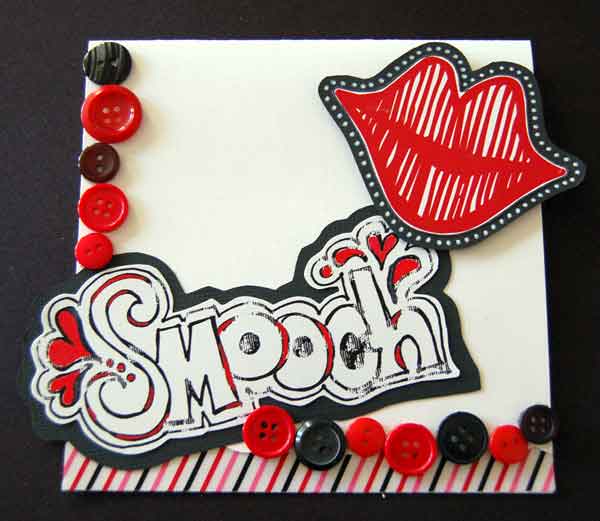
“Smooch” Card
Supplies:
Cardstock: Bazzill
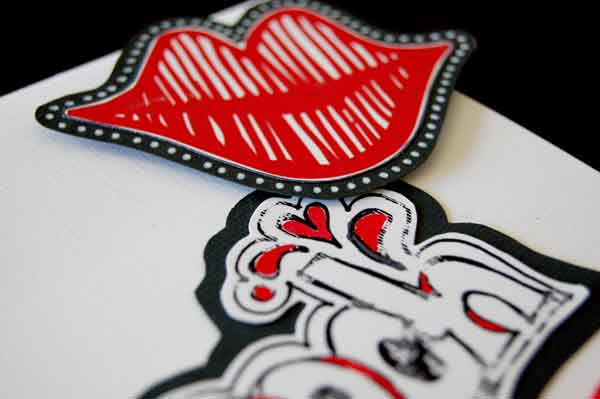
Lips: Elsie Flannigan
Font 2Peas Love Bug (twopeasinabucket.com)
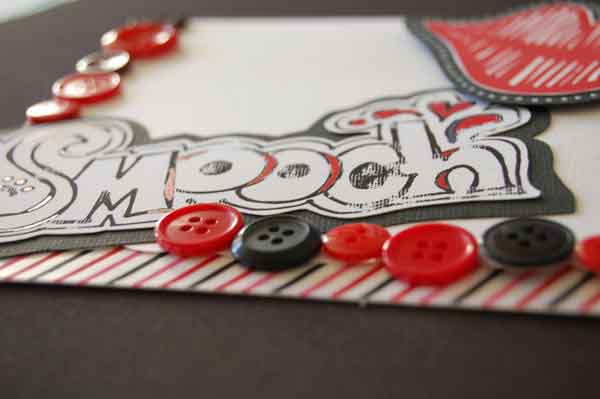
Buttons: Joann’s
Striped ribbon: KI memories
White and Red pens: American Crafts Galaxy Markers
Epson Heavyweight matte paper
Photoshop CS
Instructions:
- In Photoshop, open a New Document.
- Use the Text Tool and select the 2Peas Love Bug Font. Change the color of the font to red and type “r”. This will give you some “lips”.
- Then I used Rhonna Farrer’s Tattoo Graffiti kit and selected the word “Smooch”. Drag and drop it onto your New Document.
- Print this out and cut out.
- I decided to matte my lips and word with black cardstock and then cut around it leaving about 1/4″ all the way around.
- I colored in parts of the “Smooch” word with American Crafts Galaxy Marker in red and used a white marker to make dots around the outside of the lips on the black cardstock.
Assembly:
- The base of the card was made by cutting a sheet of white cardstock 10.5″ long by 5.5″ wide.
- Score and fold at 5.5″.
- On the front bottom edge I used scallop scissors and cut about 1/2″ up from the bottom.
- I, then, added some KI Memories self adhesive ribbon across the part of the inside of the card that was showing.
- Lastly, add buttons around the side and the bottom for a fun and funky touch.
“Love Is In the Air” Card
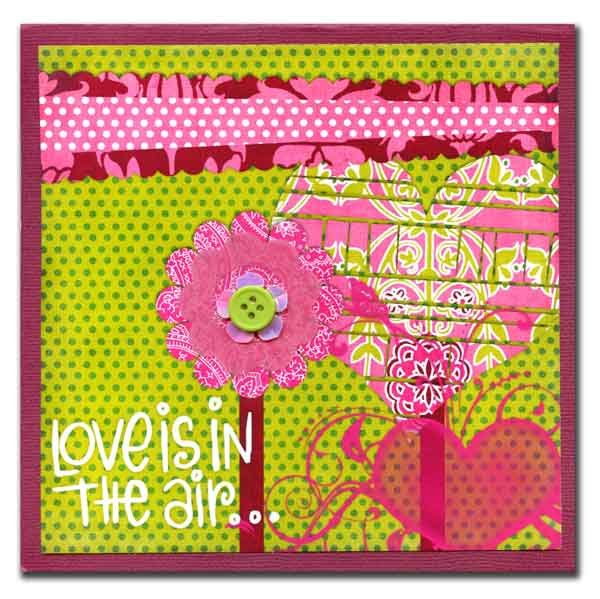
****side note**** this template is no longer available but my whole idea was that you could use these layout page templates for cards as well. There so many page templates out there that you can purchase or download for free.
Supplies:
Andie Smith - Funky Christmas PP
Cardstock: Bazzill
Font: Elsie Flannigan 2Peas Love Bug
Plastic flower: Making Memories
Button: Joann’s
Epson heavyweight matte paper
Photoshop CS

Instructions:
This card uses a layered page template. Layered templates have separate layers for each element and when you “clip” a digital paper to them the digital paper takes on the shape of that element. They are an easy way to make a scrapbook page but even easier way to make a really cool and FAST card. All you have to do is re-size it down, print it out and your card is 90% complete. Save it to your computer and when you’re in a hurry for a card just print it out quick.
- Place the digital paper above the element and then Go to Layer > Create Clipping Mask or Ctrl + G (PC) Cmd +G (Mac) and your paper will now take on that shape. Repeat this for each element on the template.
- Next add the text in the corner of the template.
- In order to re-size it down to card size, (mine is 6″x6″, 300 dpi), go to Image > Image Size.
- Print it out and adhere it to some cardstock. Then add some traditional embellishments such as flowers and buttons.
“Thank You” Card

Supplies:
Cardstock: DCVW
Font: Killer Hawaii (dafont.com)
Watercolor pencils: Reeves
Water brush: EK Success
Ribbon: KI Memories & Michaels
Pen: Sakura
Epson heavyweight matte paper
Photoshop CS

Instructions:
- Open the file Line Art Mini Kit > Overlays > Line Overlay.
- Re-size the image to 4.75″ x 4.75″.
- Open a New Document. Drag and drop the image onto the New Document.
- Now open Line Art Mini Kit > Tags > Line Tag 2, resize the image down to 3″ wide with Constrain Proportions box checked.
- Using your Text Tool type your sentiment.
- When you are done go to Layer > Merge Visible. Drag and drop this onto the New Document along with the Line Overlay you just resized.
- Print this out. I printed mine out onto white DCVW cardstock.
- I used water color pencils and colored in certain parts of the Line Art Overlay and used a water brush to paint. Let dry completely.
- Then I used a Sakura Gelly Roll silver glitter pen and traced over some of the lines and stems on both the Line Art Overlay and the Tag to give it some sparkle.
- Ink the edges of both the tag and the overlay with black Colorbox ink.
Assembly:
- Cut a piece of cardstock 11″ long by 5.5″ wide.
- Score and fold at 5.5″.
- Adhere the overlay paper to the center of the front of the card.
- Take a piece of self adhesive ribbon and place one end of the ribbon on the front of the card a little more than half way down.
- Wrap it around the inside front of the card and bring it around to the front to meet the other end of the ribbon.
- Attach the tag to the front of the card with pop dots to cover up the ends of the ribbon.
“You’re a Hoot” Card
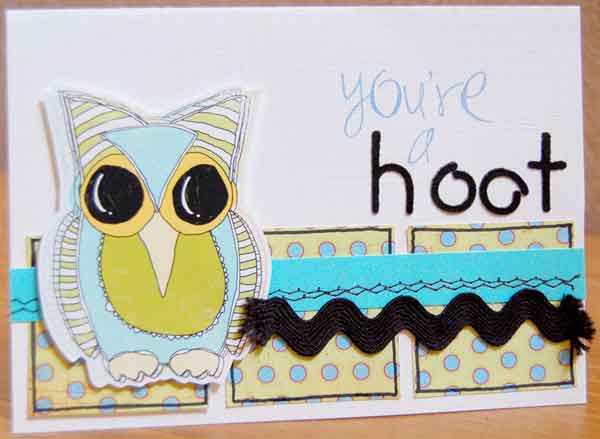
Supplies:
Tia Bennett - Woodland Brushes and Rub-ons (twopeasinabucket.com)
Doodlebug- Sugar Coated cardstock
Basic Grey - Color Me Silly
Black rick rack
SEI Iron on Letters
Stitching
American Crafts slick writer
Instructions:
- The owl comes already colored so all you need to do is print it out then cut out leaving about 1/4″ around the outside.
- Cut a piece of white cardstock for the base.
- Cut 3 squares of pattern paper and adhere them to the front of the card leaving a little bit of space between the squares.
- Cut a strip of glitter paper and sew it to the front and on top of the 3 squares.
- Apply the rub-on and iron on letters.
- Adhere the owl to the left side of the front of the card with pop dots then glue the rick rack on top of the glitter paper. Card is 5″ x 7″.
“U Are One of a Kind” Card
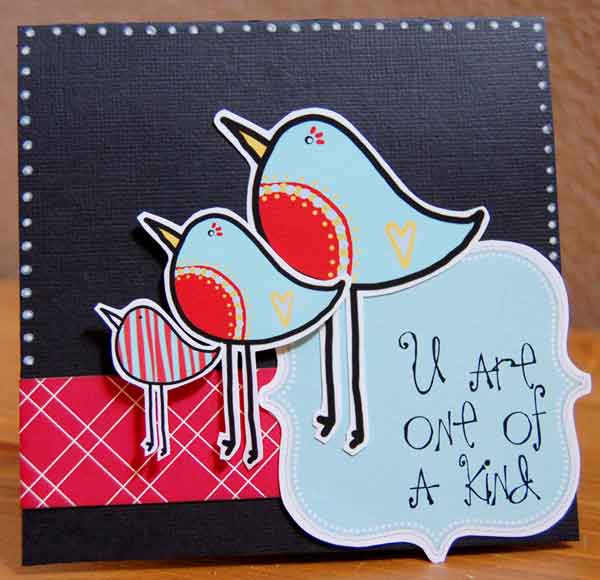
Supplies:
Truly Modly Deeply kit by Amy Hutchinson & Emily Merritt (wearestorytellers.com)
Tia Bennett - Woodland Brushes and Rub-ons (twopeasinabucket.com)
Scenic Route Pattern Paper
American Crafts Galaxy Marker
2Peas Vineyard Elsie Flannigan font
Instructions:
One of the birds in this kit comes already colored. I just made one large than the other. There is also a bird that isn’t colored and here’s how I made him striped.
- Open the bird file and using the Magic Wand select just the inside part (white) of the bird.
- Copy this part by Ctrl + C (PC) or Cmd + C (Mac).
- Next we need to add a new layer to the bird. Go to Layer > New > Layer.
- Then paste the white part that we copied into this new layer.
- Next open up the digital paper that you want to use for the bird.
- Resize the paper down to approximately the size of the bird and drag and drop the paper onto the bird.
- Make sure the paper layer is selected and above the new layer that we made.
- Go to Layer >Create Clipping Mask and the paper will take the shape of the birds body.
- Merge Visible.
- Then open a New Document and drag and drop all the birds onto it.
- Open up the Bracket element and type the sentiment on it.
- Merge Visible again and drag and drop that onto the new document with the birds.
- Print it out and cut out.
Assembly:
- Card is 5″ x 5″.
- Cut a strip of pattern paper and adhere to the front of the card.
- Then glue the bracket element onto the card with a little part of it hanging off the right and bottom side.
- Next adhere the largest bird to the card directly on top of the bracket element.
- The next bird gets a glue dot and raised just a little from the larger bird.
- The striped bird gets 2 glue dots stacked on top of each other to bring him popped up further than the second.
- Use a white marker to make dots around the outside of the card.
[/amprotect]
